
Quick Links
Key Takeaways
- The Mac equivalent of the Windows 10 Recycle Bin is called "Trash" or "Bin," and it is located in the Dock.
- Files that are deleted or dragged to Trash will stay there until you "empty" it, giving you a chance to undelete them before they are lost forever.
- To delete files using Trash, simply click and drag the item onto the Trash icon in the Dock, or you can right-click the item and select "Move to Trash."
If you're familiar with the Windows 10 Recycle Bin for deleting files and you just switched to Mac, you might wonder where the equivalent is on a Mac. It's called "Trash," and it's located in the Dock. Here's how to use it.
The Recycle Bin Is "Trash" or "Bin" on a Mac
Since 1984, all versions of the Mac desktop operating system have included a trash can (waste bin), which is formally called "Trash" in the United States and "Bin" in some territories. The concept originated on the Apple Lisa, where it was called "Wastebasket."
Like the Recycle Bin on Windows, when you delete a file or drag it to Trash, it stays there unless you "empty" it by using the "Empty Trash" command in Finder. That way, you have a second chance to "undelete" a file by dragging it out of the Trash before it's lost forever.
How to Delete Files with Trash
To delete a file or folder using Trash, click and drag the item onto the Trash icon in the Dock, and then release your mouse or trackpad button.
If the Trash was previously empty before you dragged an item into it, the Trash icon itself will change, showing crumpled papers inside of it.
The Trash icon with crumpled papers lets you know that there are files in Trash. By default, items put into the Trash will stay there forever unless you remove them, empty the Trash, or schedule the Trash to remove items automatically after a period of time (see below).
You can also move files to Trash without using the Trash can icon on the Dock. In Finder, simply select a file and choose File > Move to Trash in the menu bar, or right-click the item and select "Move to Trash."
How to Remove Items from the Trash
Trash works a lot like a special folder. If you've moved a file to Trash by mistake and you want to get it back, click the Trash icon on your Dock, and the "Trash" window will open in Finder.
From there, you can either drag the items out of the Trash window and onto the desktop (or another folder), or you can right-click them and select "Put Back" in the menu.
You can also select items in the Trash and choose File > Put Back in the menu bar, and they will return to their original locations before you moved them to the trash.
How to Empty the Trash
To empty the Trash — which will permanently delete all of the files you've placed in the trash can — right-click the Trash icon and select "Empty Trash" from the menu that appears.
Once you empty the trash, you won't be able to get the deleted files back without relying on a backup or using third-party tools (that aren't guaranteed to work). Make sure that you have full backups with Time Machine before deleting anything.
Or, with Finder in the foreground, you can choose Finder > Empty Trash in the menu bar at the top of the screen.

As with most things on the Mac, there's a keyboard shortcut alternative: Press Shift+Command+Delete on your keyboard to empty Trash with no clicks necessary.
How to Empty the Trash on a Schedule
If you'd like to automatically empty items from your trash after 30 days, Finder provides an option for that. To turn it on, focus on Finder by clicking it in the Dock.
Next, select Finder > Settings in the menu bar, or press Command+Comma on your keyboard. In Finder Preferences, click the "Advanced" tab, and then place a check mark beside "Remove items from the Trash after 30 days."
Close Finder Preferences. Thirty days after you move an item to the Trash, it will be permanently emptied from Trash and deleted.
How to Bypass the Trash (and Delete a File Instantly)
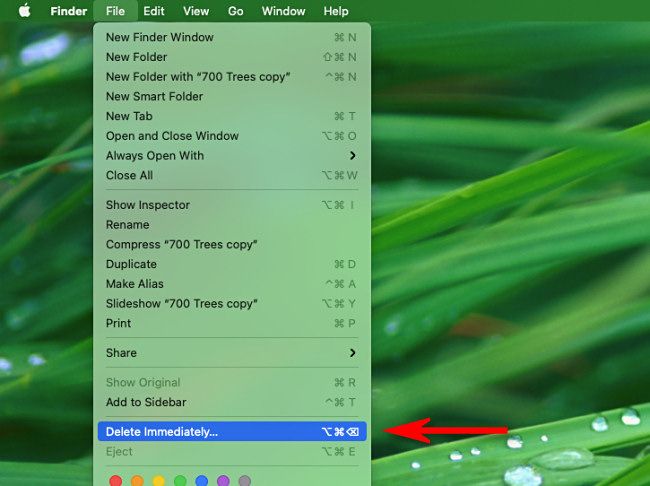
If you'd like to instantly delete a file or folder without sending it to Trash, you have a couple of options. In Finder (or on the Desktop), select the item, and then hold down the Option key on your keyboard and select File > Delete Immediately in the menu bar.
Or, you can select the item and press Option+Command+Delete on your keyboard. You'll see a warning message telling you that you're about to permanently delete the items and that there's no going back. If you're ready, click the "Delete" button.
If you click "Delete" here, you will never be able to recover the item or items unless you have a backup!
After that, the file will be permanently deleted.
How to Recover Deleted Files on the Mac
If you've permanently deleted something by accident, it might be possible to get it back if you've previously enabled Time Machine or via a third-party tool. Be careful out there, and good luck!